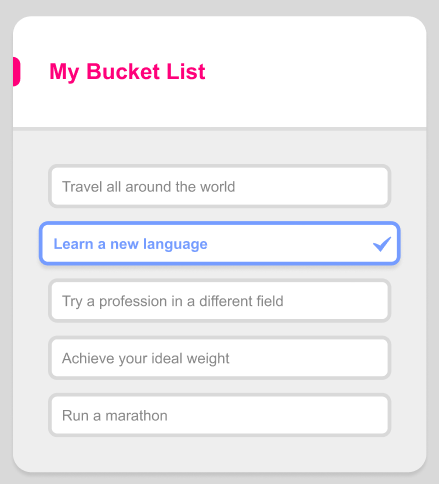
*수도 엘리먼트는 inline 이다.
수도엘리먼트를 통해 꾸밈 주기

.bucketlist-header {
    height: 120px; /*디자이너가 의도한 값*/

    display: flex;
    align-items: center;
    color:  #FF007A;
}
.bucketlist-header::before {
    background-color: currentColor; /*★수도 엘리먼트는 inline 이다!!! ★*/
    display: inline-block;
    content: ' ';
    width: 8px;
    height: 32px;
    border-radius: 0 10px 10px 0;
    flex-shrink: 0;
}
ㄴ 상위 박스는 flex 로 부여하여 좌우 정렬한다.
ㄴ sudo 엘리먼트 before를 통해 좌측에 있는 바를 만들어준다.
flexbox 내부 컨텐츠 늘어나는 경우 안정화 하기

.bucketlist-header h1{
    font-weight: 600;
    font-size: 24px;
    flex-grow: 1; /*안정적인 레이아웃에 가깝다.*/
    padding: 0 30px;

    /*flex-basis값이 auto 이면 컨텐츠 크기가 계속해서 늘어난다. */
    flex-basis: 0;
}
ㄴflex-basis 값에 기본값인 auto가 들어있으면 컨텐츠 크기에 맞춰져있으므로, overflow!
ㄴflex-basis: 0 값을 주고 flex-grow:1 로만 길이를 제어한다 (자동으로 늘어나니까).
min-height 값으로 상자 늘이기
.bucketlist-header {
    min-height: 120px; /*디자이너가 의도한 값*/
    /*컨텐츠 양이 늘어나는 경우에 유동적으로 박스가 늘어날 수 있도록*/

    display: flex;
    align-items: center;
    color:  #FF007A;
}
ㄴ 위의 예시와 같이 컨텐츠가 늘어나는 경우 박스도 함께 늘어날 수 있도록 min-height를 설정해준다.
box-sizing: border-box;

- 초기값 : content-box;
패딩을 입으면 몸이 늘어난다! -> 원래 패딩을 주면 height + padding 이렇게 추가로 들어가게 되는데,
box-sizing: border-box; 를 하면 패딩값이 height값 안에 포함되어 나온다.
싸고 있는 부모 요소로 border-radius 주기
.bucketlist {
    background-color: #eee;
    border-radius: 12px;
    overflow: hidden;
}
::after를 통해 한줄에 체크 이미지 넣기

.lists li.is_active {
    color: #759CFF;
    margin-left: -10px;
    margin-right: -10px;
    border: 4px solid currentColor;
    box-shadow: 0 4px 4px 0 rgb( 0 0 0 / .1);
}

.lists li.is_active::after{
    content: 'after';
    margin-left: auto;
    background-image: url("./images/check.png");
    width: 20px;
    height: 20px;
}
ㄴ 내부에 좌우 배치를 하기 위해 flexbox를 주었다.
ㄴ 이미지는 background-image 로 넣는다.
ㄴ width와 height를 넣어주면 완성
'HTML+CSS' 카테고리의 다른 글
| html/css #11-vw단위, z-index 쌓임맥락, 벤다이어그램 (0) | 2023.12.20 |
|---|---|
| html/css #9-flexbox 반응형 맛보기: 수도 엘리먼트, 네거티브마진 (insideout 과제) (1) | 2023.12.19 |
| html/css #10-position (1) | 2023.12.19 |
| html/css #8-flex-direction (1) | 2023.12.18 |
| html/css #7-1 동물 소개 페이지 flexbox로 중앙정렬하기 (0) | 2023.12.13 |


